5.31.2011

Beach Bummin'

In Nassau at the Atlantis Resort. Water slides= deadly. So fun.
The second part of our vacation was a cruise out of Miami to the Bahamas. Oh man, I didn't want to come back, that's for sure. The Bahamas are such a great destination because....
 #1) It is obviously beautiful
 #2) The official language is English 
#3) Everyone is so nice, it's almost overwhelming
I would definitely go back...soon. Beaches, sunsets, fruity drinks, cold beer, fresh fruit, warm water, island music, bathing suites....I guess you get the point. Here are some pics of our trip!

Cliche sand writing & some sea turtles with starfish!
A little buddy I found on the beach :)
Sunset from our rooms balcony on the cruise
 But I did come back to a blooming Crabapple tree, which was super pretty. It even inspired me to plant a little garden...pics to come soon!

5.29.2011

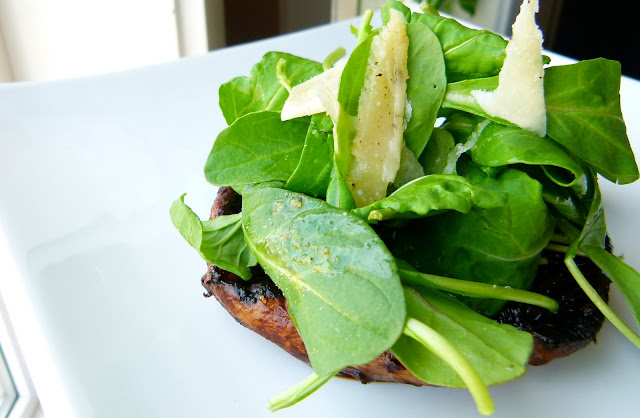
Grilled Balsamic Portobello Mushrooms with Baby Arugula


Today was filled with planting flowers, trying to fix dead spots of grass (courtesy of Oscar), and grilling! Grilled veggies are one of my favorite things about summer.  This grilled Portobello recipe is super easy and equally tasty. Tangy balsamic vinegar turns sweet after grilling, and fresh arugula make this lunch  dish as healthy as can be. Summer is here so heat up your grill! Just is time for meatless Monday :)  

Grilled Balsamic Portobello Mushrooms with Baby Arugula

2 Portobello Mushrooms
1/2 cup balsamic vinegar
1/4 cup + 1 tablespoon extra virgin olive oil
1 clove garlic
1 teaspoon dried oregano
1/2 teaspoon salt
1/2 teaspoon black pepper
1 cup baby arugula
1/2 lemon
1/3 cup Parmesan cheese


Start by preparing your mushrooms. Using a sharp knife, remove stem from mushrooms. Place into a shallow dish or Tupperware container. 


Add 1/2 cup balsamic vinegar, 1/4 cup olive oil, salt, pepper, and oregano to dish. Roughly chop garlic and add to container as well, tossing to combine. Flip mushrooms and be sure to get a little of the marinade into the middle, along with some of the pieces of garlic. 

Place into the refrigerator for 1-2 hours, turning over half way through, always coating with marinade.  


Once mushrooms have marinated, you are ready to grill! Heat grill to medium heat and add mushrooms. Cook for about 3-4 minutes per side, or until nicely brown and caramelized.


While mushrooms are grilling, you can prepare your super simple baby arugula salad for topping. Place arugula in a bowl, along with 1 tablespoon olive oil, juice of 1/2 lemon, salt and pepper to taste and Parmesan cheese shavings. Toss to coat, and set aside. 

Grilled perfection!
Remove mushrooms from grill and place stem side up on a plate, creating a little bowl. Add 1 cup of arugula to each mushroom, and enjoy!

5.26.2011

Garlic Soy Chicken with Kiwi Ginger Salsa


When we were in Miami last week we ate a restaurant in South Beach called "Meat Market". The name alone is funny to me, and what is even more funny is that I picked a restaurant with that name in the first place. After paying $14 for a drink and $20 for an appetizer I thought my wallet was going to bust into flames. But I had a great Chilean Sea Bass there with a delicious mango fruit salsa. And while it is pretty hard to get my hands on Chilean Sea Bass in Fort McMurray, Canada, I did manage to find some chicken and make a little fruit salsa of my own!

A reason to be vegetarian? This chicken resembles a fetus.... gross
Garlic Soy Chicken with Kiwi Ginger Salsa

1 lb boneless, skinless chicken breast
1/2 cup soy sauce
1/4 cup brown sugar or honey
2 cloves garlic
1/2 lime, juiced

Start by making your marinade. In a small bowl add soy sauce, brown sugar, and lime juice. Roughly chop garlic and add to bowl. 

Whisk together until brown sugar or honey is all the way dissolved and pour over chicken in a bowl or zip lock bag. 

Place chicken in refrigerator for 2 hours or overnight....or as long as you can wait before you get hungry.


Salsa
1 kiwi
1/4 yellow bell pepper
1/2 cup pineapple, canned or fresh
2 green onions
1 teaspoon ground ginger
1/2 teaspoon rice vinegar
2 tablespoons pineapple juice

Peel and dice your kiwi, bell pepper, and pineapple. Be sure to make uniform pieces. Thinly slice green onion adding to a bowl, along with diced fruit and vegetables. 

Add ginger, rice vinegar, and pineapple juice and stir to combine. Refrigerate until chicken is ready to serve.


After chicken has marinated, cook however you like! I prefer grilling, because everything taste better grilled. To grill, heat to medium heat and spray with non-stick spray. Once grill is hot, place chicken breast on grill for 6-7 minutes per side, or until cooked through. 

To plate just top your chicken with a few spoonfuls of fruit salsa and enjoy! Serve with brown rice or over lettuce for a tasty chicken salad!

5.24.2011

Chopped Vegetable & White Bean Salad with Fresh Herb Vinaigrette


After a vacation I always feel.... how do I put this? Like a piece of garbage. It is so hard to eat healthy on vacation, especially on a cruise where you are surrounded by dessert. So after a trip to the store to stock up on food (with under 500 calories per serving) I decided I need to make something refreshing and healthy! I was so surprised how great this turned out, and I was still eating it 2 days later with a different flavor every time! And the best part was, I got to use fresh herbs that I planted a few weeks ago. They didn't even die after not watering them for 10 days while on my cruise :)


Chopped Vegetable & White Bean Salad with Fresh Herb Vinaigrette

2 mini cucumbers or 1/2 large cucumber
1 cup cherry tomatoes
1/2 red onion
1/2 yellow bell pepper
1/2 orange bell pepper
1 can white beans

Vinaigrette 
1/4 cup extra virgin olive oil
1/4 cup red wine vinegar
1 1/2 tablespoons lemon juice
1 clove garlic
2 tablespoons fresh parsley
2 tablespoons fresh basil
salt & pepper to taste


Rinse and drain white beans and place into a large mixing bowl.

 Slice mini cucumber in half, length-wise, and then chop into 1/4 inch thick pieces. Add chopped cucumbers to bowl.

Slice onion into thin strips and then rough chop these strips, adding to bowl when finished. 

Half cherry tomatoes and add to bowl. 

Cut bell peppers into small pieces and add to bowl. 


To make vinaigrette add olive oil, vinegar, and lemon juice to a small bowl. Mince garlic, and chiffonade herbs and add to bowl , along with salt and pepper to taste.  Using a whisk, beat until vinegar and oil are emulsified and fully combined. 


Pour over beans and vegetable. Using a large spoon slowly toss to combine until all vegetables are coated. Refrigerate for 20-30 minutes until cold. You can eat alone or use to top a green salad! 

5.15.2011

Southern Comfort

This weekend my husband and I made the trip from Northern Alberta to the Southern US. Statesboro, Georgia was our final destination (for now) to watch my sister graduate from college! I had never been to Georgia so I was so excited to see the sights and eat some real southern food. And I got to do all of that! Here are a few highlights of my trip!


In one of the various squares throughout Savannah, Georgia. This city was so amazing. Original buildings from the 1700's and cobblestone streets too! All of the trees had Spanish Moss hanging from them too, and you can see it in this picture above. Very cool.


A picture above is the graduation ceremony, which was held at the football field. There were over 2,000 undergrads receiving degrees! But the weather was beautiful and listening to the professors say "Magna Cum-Laude" in Southern accents was more than enough to keep me entertained :)


After grad we went to a little spot call "Gnat's Landing" for lunch. This place looked a little shady, but so does Thai food out of someones basement :) They had this awesome wall of beer cans held up by chicken wire. If that doesn't sound country I don't know what does. After having a few pitchers of Blue Moon (my favorite beer that they don't have in Canada!) and eating some deep fried pickles, I felt my trip to the south was complete!
Pasta salad, deep-fried pickles, baked beans, sweet potato fries, and a wrap! Enough carbs to kill a man.

5.10.2011

Roasted Spiced Chickpeas


Few foods are as good hot and they are cold. Pizza, cheese, chocolate, and cookies. That is about all on my list. But this is my newest addition. These are great hot out of the oven, or the next day on top of your salad.  These little nuggets are packed with flavor, crispy, and healthy to boot! With a few simple ingredients, and only a few minutes in the oven, this snack is one you don't have to feel guilty about!


Roasted Spiced Chickpeas
1 can chickpeas
1 tablespoon extra virgin olive oil
1/2 teaspoon garlic powder
1/2 teaspoon onion powder
1/2 teaspoon yellow curry powder
1/2 teaspoon chili flakes
1/2 teaspoon paprika
1/2 teaspoon Cajun seasoning
1/2 teaspoon sea salt
1/4 teaspoon black pepper


Rinse and drain chickpeas. Pat dry to remove excess moisture.

Add to a medium mixing bowl along with curry powder, garlic powder, onion powder, paprika, chili flakes, salt and pepper. 


Pour 1 tablespoon olive oil into bowl and toss or stir to combine. Be sure every chickpea is coated with spices. 


On a large baking sheet spread chickpeas out into one layer. Place in the oven to roast for 15-20 minutes.  After 10 minutes remove from oven and shake or stir to prevent sticking and burning. 
Remove from oven once chickpeas are brown and crispy! Enjoy as a snack, appetizer, or on top of salad!

5.06.2011

Nate's Ultimate Bacon Burger


The other day my husband and I were talking to our friends Nate and Kelly on the phone (by talking I mean he was talking, and I was yelling in the background), and they started to talk about the blog and how it was slightly vegetarian. After TJ hung up, he turned to me and said, "You need to make a burger for Nate". TJ and Nate were college roommates and ate their share of burgers. So I did something I rarely do, and cooked red meat. This burger may be the ultimate bacon lovers burger, maybe even the ultimate burger lovers burger.... Bacon on the inside, bacon on the top, caramelized onions, and cheddar cheese.....my heart is stopping just talking about it! But you only live once, and this is a treat you are sure to enjoy.


Nate's Bacon Burgers
1 pound lean ground beef
12-14 strips of bacon
1/2 cup chopped onion
2 cloves garlic, minced
1 egg
2 teaspoons Worcestershire sauce
dash of hot sauce
3/4 cup whole wheat bread crumbs
1 teaspoon oregano
1 teaspoon pepper

Toppings
1 large yellow onion
 1 tablespoon olive oil
8 slices cheddar cheese
Lettuce
8 whole wheat buns

Makes approximately 8 burgers

First, slice your yellow onion into even rings and place into pan with olive oil. Heat over medium heat, occasionally stirring. This will take a while so start here first! They should be done and ready to top the burgers by the time everything is cooked.

Heat a large pan over medium heat. When hot, add all strips of bacon, cooking to desired crispiness. After bacon is cooked and cooled, reserve 8-10 strips for topping your burgers, and place the remaining bacon on a large cutting board. Chop bacon into small pieces and add to a large mixing bowl.


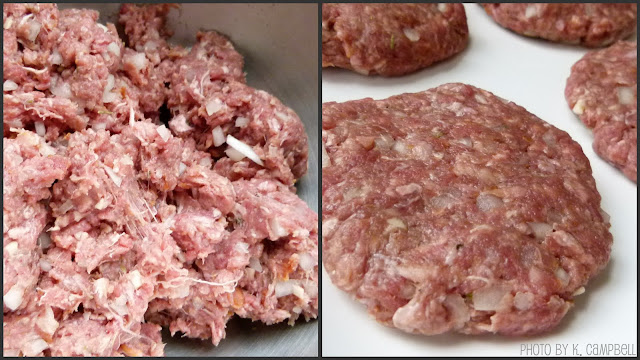
In the same large mixing bowl as the crumbled bacon, add ground beef, egg, bread crumbs, hot sauce, Worcestershire sauce, oregano,  pepper, diced onions, and minced garlic. Using your hands or a large spoon mix well, until mixture is uniform. Using 3/4-1 cup of the mixture at a time, form into round patties. Be sure to make the patties an even thickness, so they cook the same, all the way through.
I like to brush my burgers with a little soy sauce after flipping to make them a nice deep brown with a little flavor!
Heat your grill to medium-high heat. No need to use spray here :) Place each patty on hot grill and grill for 5-7 minutes on each side or until no longer pink in the middle. Remove from heat a get ready to top!

To assemble, place burger on whole wheat bun, add one slice on cheddar cheese, 1-2 strips of bacon , a spoon full of caramelized onions, lettuce and your favorite condiments. Then....hit the gym :)

5.03.2011

Spicy Barbecued Shrimp with Cheddar Polenta


Another attempt at a restaurant re-creation! This time from the waterfront Elliot's Oyster House in 
downtown Seattle. Their BBQ shrimp with cheddar polenta is so good. Sweet and spicy shrimp and cool creamy polenta are sure please anyone with taste buds. Polenta is basically cornmeal. Well I used cornmeal because real polenta is hard to come by, and it works just as well. It is quick and easy to cook, and a great alternative for people who are sensitive to gluten! You can cook your shrimp anyway you like...but isn't everything better on the barbecue?


Spicy Barbecued Shrimp with Cheddar Polenta
1 cup coarse yellow cornmeal
4 cups water
2 tablespoons butter
1 cup shredded cheddar cheese
2 tablespoons cream cheese
1 teaspoon salt
1/4 teaspoon pepper
1/8 teaspoon nutmeg

20-24 shrimp, peeled and deveined
1 tablespoon olive oil
salt and pepper
1 teaspoon Sambal Oelek ground chili paste
1 cup barbecue sauce

Turn on your grill to medium high heat. 


Begin by threading your shrimp onto metal skewers. Be sure to get the shrimp is 2 places so they dont fall off. Lay flat on a cutting board and drizzle with olive oil. Then crack sea salt and black pepper over top.


Place shrimp on grill and cook for about 2 minutes. Flip over and brush with barbecue sauce, cooking another 2 minutes. Flip again and brush with barbecue sauce. The point here is to cook the shrimp, then coat with barbecue sauce and cook some more. They taste so good once you have a nice sticky coating with a little char as well.

After your shrimp have cooked you can place in the oven at a low temperature to keep warm while you cook the polenta. 


Your ideal barbecue goal :)

To make polenta:
1.)In a medium pot, boil 4 cups of water. 

2.)When water is boiling add cornmeal and butter, and reduce to a simmer. Simmer for 10- 15 minutes, stirring occasionally. 

3.)Once cooked, add your cheddar cheese, cream cheese, salt, pepper, and nutmeg. Whisk quickly to combine until cheese is melted and immediately serve. Polenta turns from creamy goodness to sticky mess really quick, so the sooner the better!!


To plate, add around 1 cup of polenta to your dish. Top with 1 skewer of shrimp and drizzle with a spicy barbecue sauce. 


I use 1 teaspoon on chili paste (super spicy) combined with 1/2 cup of barbecue sauce, to make my spicy sauce. I made a ton of the sauce from an earlier recipe, below, and just used it for the entire recipe!

 Barbecue Sauce from BBQ Pulled Chicken


5.02.2011

Oven Roasted Asparagus


This simple side dish is ready in 15 minutes or less and is a great addition to any meal. I season with  regular old sea salt and fresh ground pepper, but you can add any spice you like. I think it would be great with lemon pepper, or garlic salt as well. And since it is spring, and asparagus is in season....you can try them all!


Oven Roasted Asparagus
1 Bunch Asparagus
1 tablespoon Olive Oil
Sea Salt
Black Pepper

Prepping your asparagus is super easy, but I don't think many people do it right. Never use a knife to cut the ends off. Instead, grasp your asparagus by both ends and begin to bend. The asparagus will snap where it is supposed to snap naturally. Leaving the woody end to be discarded and the tender, tasty end for you to eat! 


Next place your trimmed asparagus onto a baking sheet and drizzle with 1 tablespoon of olive oil. Using your hands, toss the asparagus so every piece is coated with olive oil. 


Spread evenly on the baking sheet and sprinkle with sea salt and cracked black pepper, once again tossing to coat.


Bake in the oven for 7-10 minutes at 350 degrees or until asparagus is tender. You can serve as a side dish with dinner, or with scrambled eggs for breakfast!

Related Posts Plugin for WordPress, Blogger...